Bypassing CollegeBoard’s Lockdown Browser - A comedy of failed obfuscation and VM detection
THIS BLOG POST IS ONLY FOR RESEARCH & EDUCATIONAL PURPOSES!
An anonymous friend and fellow CTFer from another school recently contacted me about a “CollegeBoard Lockdown Browser,” a Chrome extension installed on their district’s school Chromebooks. When triggered, it would open a completely locked-down browser that only displayed the AP Classroom exam, disabling all other functions of the computer (alt-tabbing, screenshots, etc). As with any good security researcher, he was curious just how the extension did all of this (and more importantly, how to bypass such security measures).
Now, I hate CollegeBoard as much as the next student, so I decided to take a look for myself.
Using a VM
I would like to note the extension is completely bypassable by just… running a ChromeOS virtual machine. The extension will lock down the VM but leave the rest of your computer usable, so…
Getting past the VM detection
My friend sent the extension to me because he noticed CB had added anti-VM measures recently. So, all I had to do was figure out how the extension detected a VM, and see if I could get around it. I was pretty confident it would be a easy bypass as there are just so many things you can do with Javascript and a measly extension.
The extension can be found here: LockDown Browser: AP Classroom Edition. I remember my friend telling me the extension & Lockdown Browser (which I will abbreviate as LB) also works on Windows and macOS computers, so I didn’t think it relied on any ChromeOS-specific internals.
With Chrome extensions, I used a CRX extractor to download the extension’s (obfuscated) src.
Finding the anti-VM code
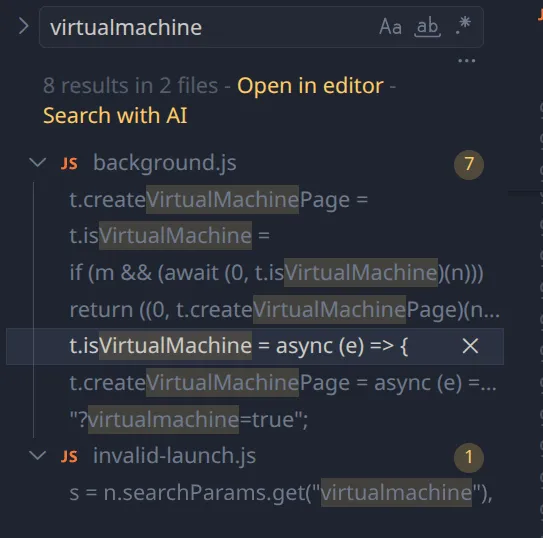
Doing a folder-wide search in VSCodium for the keyword “virtualmachine” reveals the function isVirtualMachine, which simply opens an invisible WebGL canvas and checks for the renderer. If the renderer reports back as exactly “VMware Inc., SVGA3D” or “Mesa, virgl”, a VM is detected and the extension refuses to start the test.
t.isVirtualMachine = async (e) => {
  const t = ["VMware Inc., SVGA3D", "Mesa, virgl"],
    a = new OffscreenCanvas(100, 100).getContext("webgl");
  if (a) {
    const o = a.getExtension("WEBGL_debug_renderer_info");
    if (o) {
      const r = a.getParameter(o.UNMASKED_RENDERER_WEBGL).toLowerCase();
      if (
        (e && (await e.addToLogs(`UNMASKED_RENDERER_WEBGL: ${r}`)),
        t.some((e) =>
          a
            .getParameter(o.UNMASKED_RENDERER_WEBGL)
            .toLowerCase()
            .includes(e.toLowerCase()),
        ))
      )
        return !0;
    }
  }
  return !1;
};
Using webglreport we can confirm using the standard
qemu-system-x86_64 -drive format=qcow2,file=chromeosflex.qcow2 -m 8G -smp 2 -enable-kvm -display "gtk,gl=on,show-cursor=on" -device virtio-vga-gl -usb -device usb-tabletto start the VM results in  “Mesa, virgl” being reported.
Bypass
We can easily get around this by changing the virtualized GPU device that QEMU uses to virtio-vga:
qemu-system-x86_64 -drive format=qcow2,file=chromeosflex.qcow2,cache=writeback -m 8G -smp 4 -cpu host -enable-kvm -display gtk,gl=on,show-cursor=on -device virtio-vga -usb -device usb-tablet![]()
The drawback is this does get rid of hardware accel, so performance will be a bit worse and you may see some visual artifacts in the VM. Nothing should be unusably bad, however.